• PORTFOLIOS
  • Prints
  • Licensing
  • Books
  • About
  • CONTACT
  • Blog
  • Instagram
  • LINKS
  • TECH INFO
Menu

William Karl Valentine

  • PORTFOLIOS
  • Prints
  • Licensing
  • Books
  • About
  • CONTACT
  • Blog
  • Instagram
  • LINKS
  • TECH INFO

Photographing the Doo Dah Parade in Pasadena with Frank on 11-24-24

Frank Schlegel (who lost his home) and other photographers of the Eaton Fire

March 5, 2025

I have known Frank Schlegel for well over forty years and first met him when he was working for Mike O’Brien who owned Flag’s Photo in Pasadena. When Flag’s closed Frank went to work for Samys Camera and he has been one of my best photography equipment contacts throughout my entire career. Frank and I have photographed together, most recently the last Doo Dah Parade in Pasadena, and he did my portrait for the dust cover of my Santa Anita book. Pasadena has a wonderful history of photography. The Huntington Library has an amazing photography collection, Pasadena City College and the Art Center of Design have good photography programs and going back to Adam Clark Vroman there have been some decent photographers who have called Pasadena home. Pasadena is one of those places if you grew up there you are always connected to the city whether or not you still live there or you move away. Frank has been a fixture in the Pasadena photo community for as long as I can remember. On January 7th, Frank lost his apartment, and most of his belongings, in the Eaton Fire. His apartment was four and a half blocks away from my mom’s house/

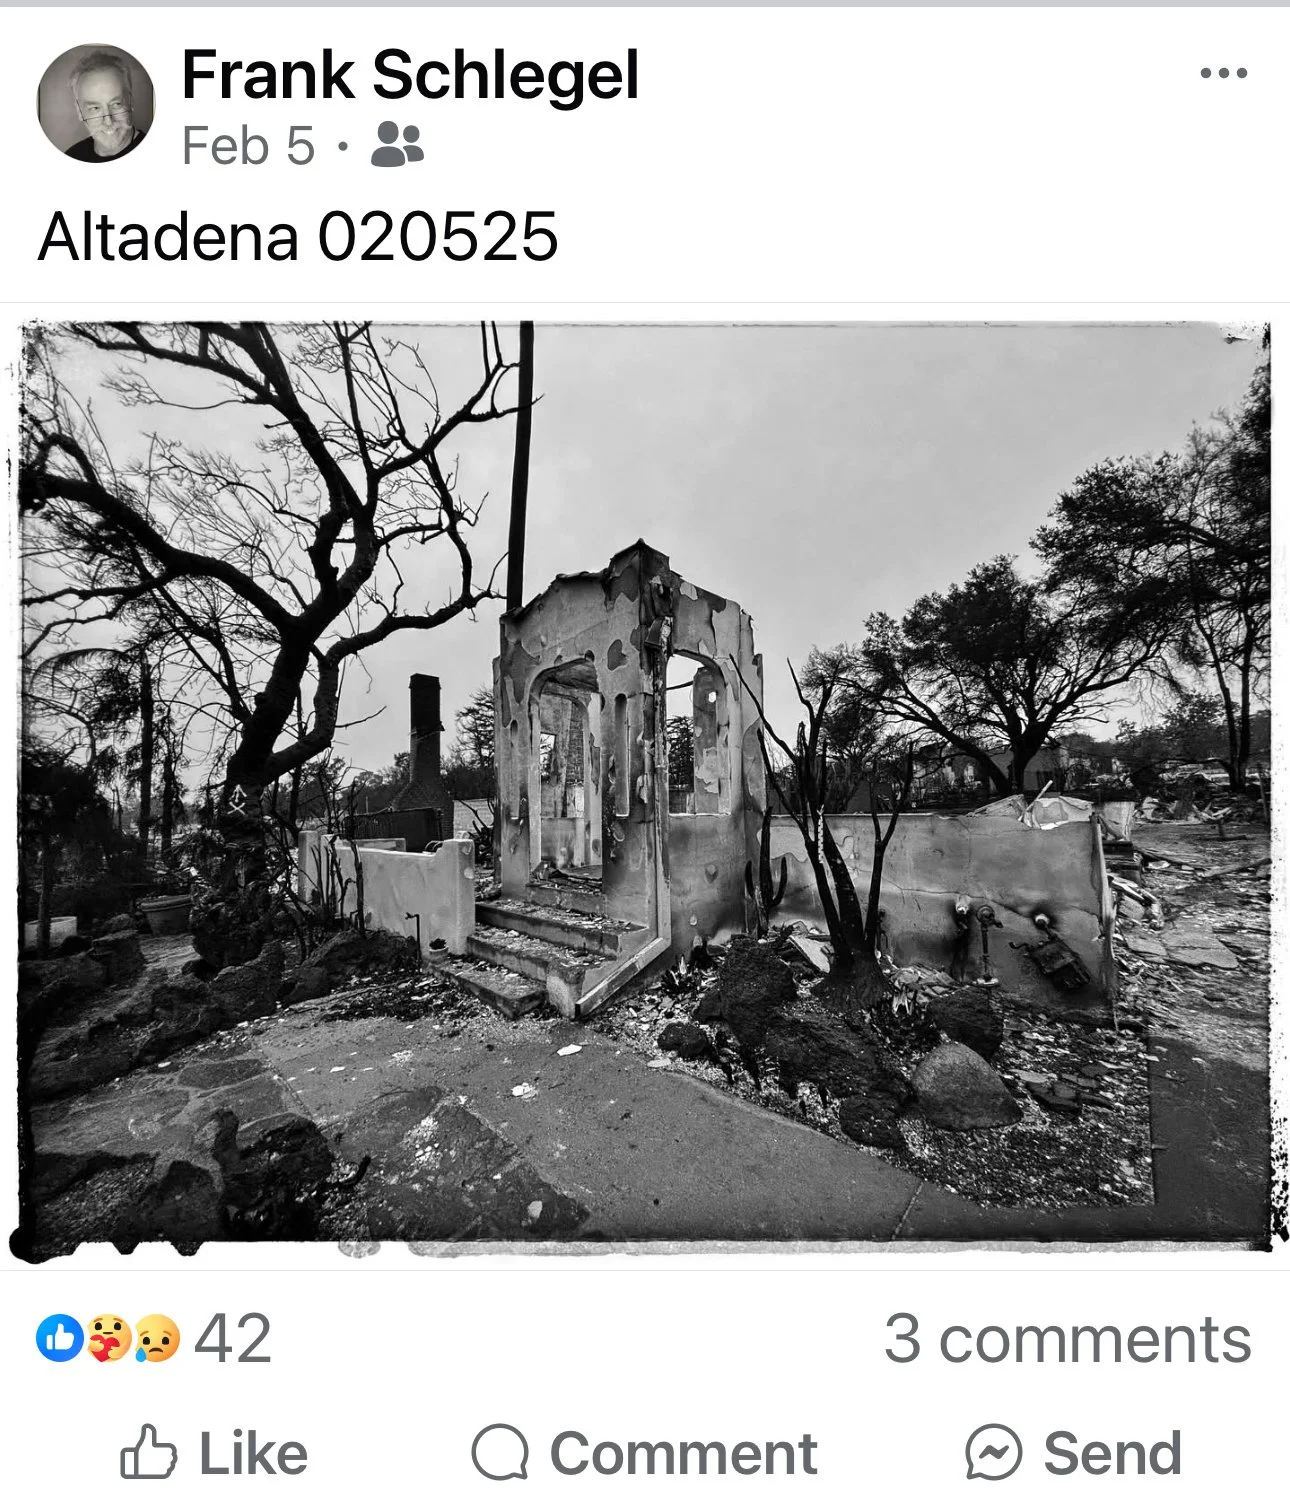
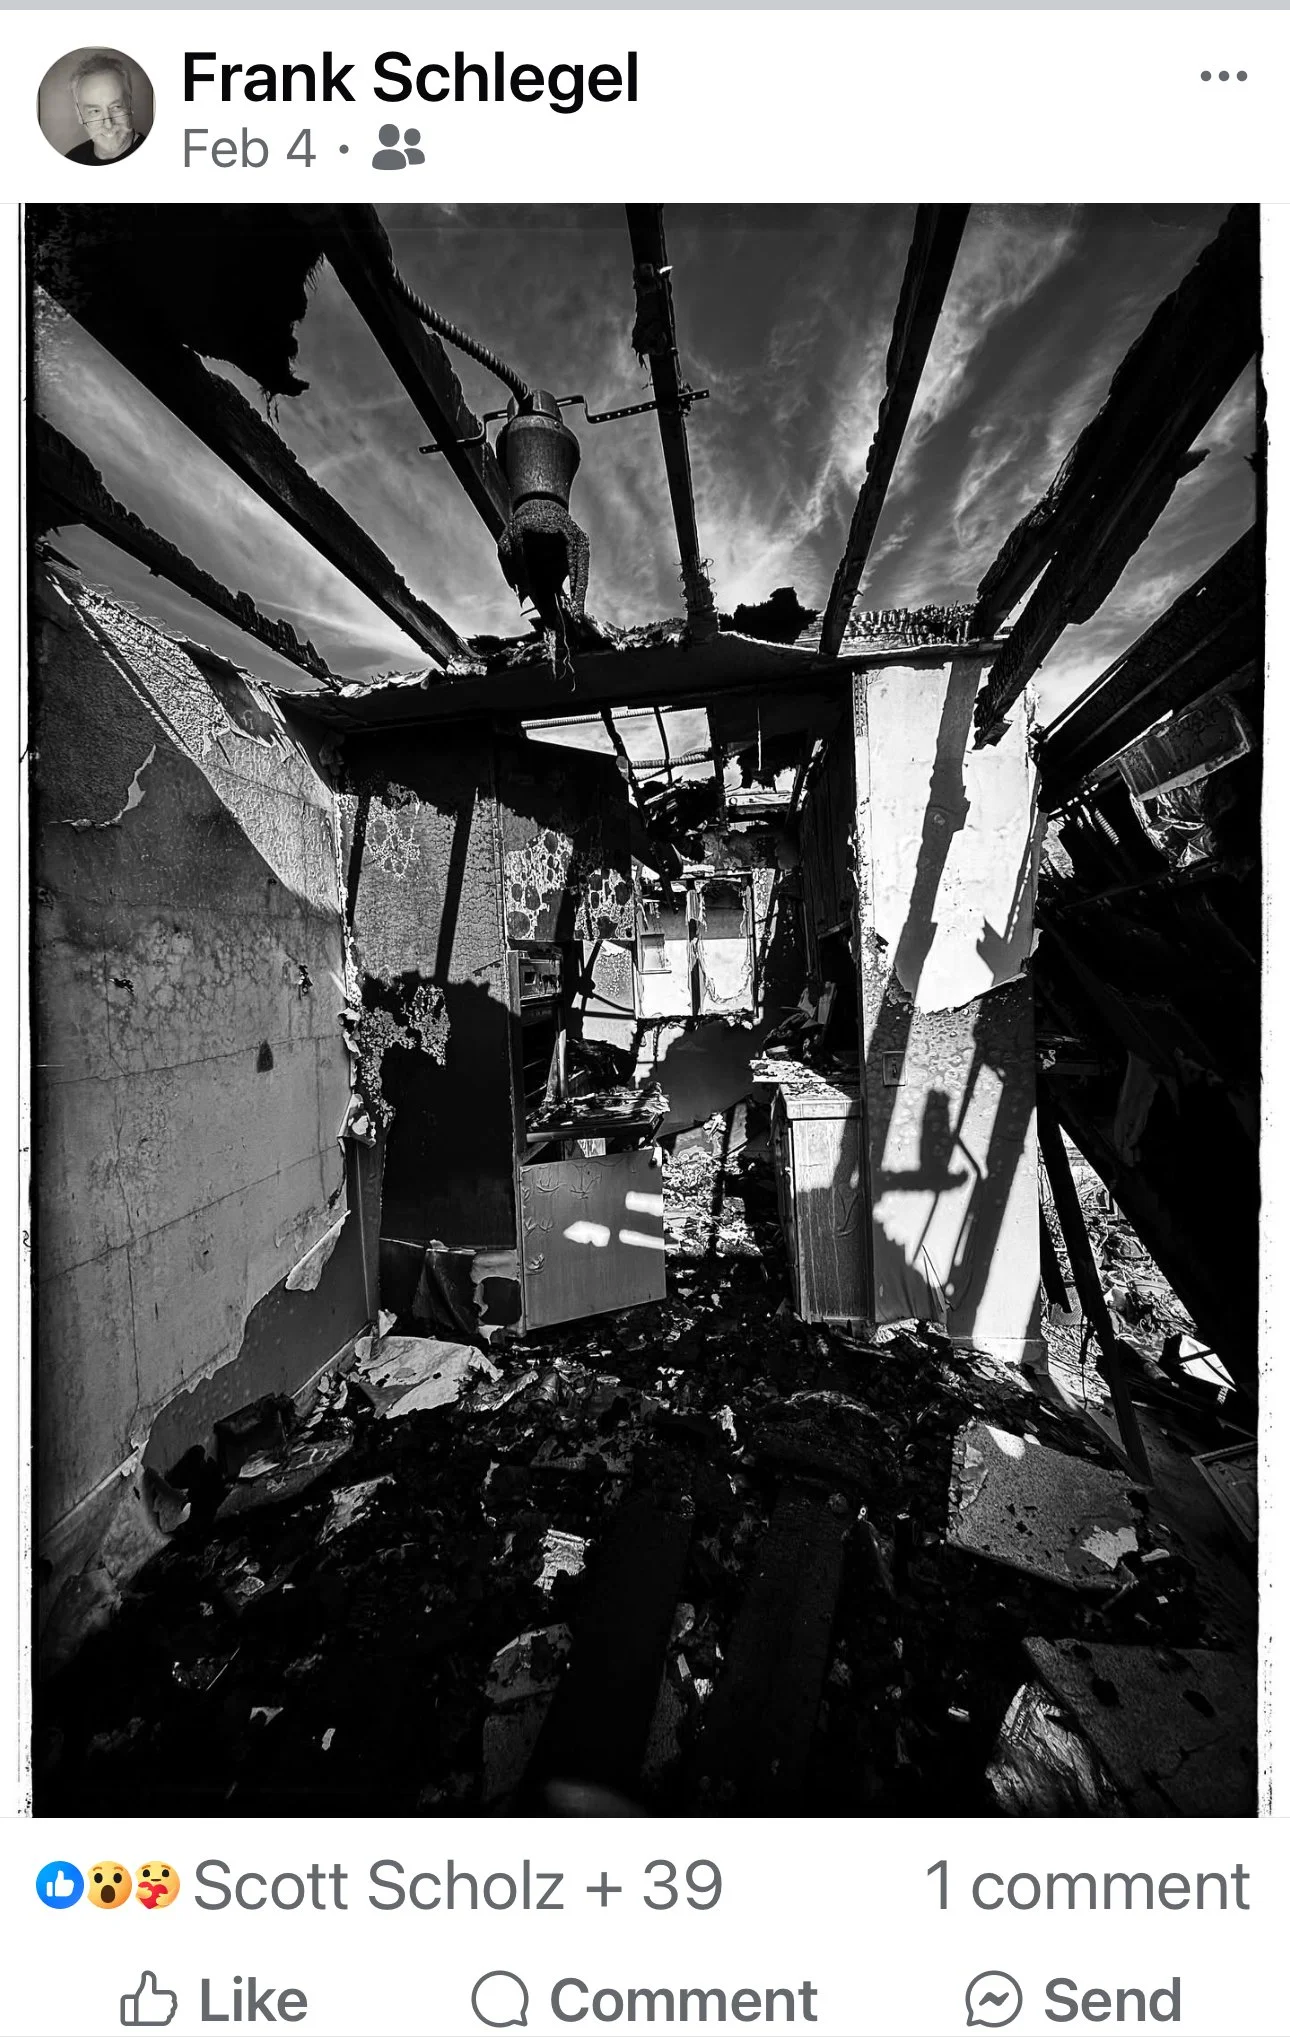
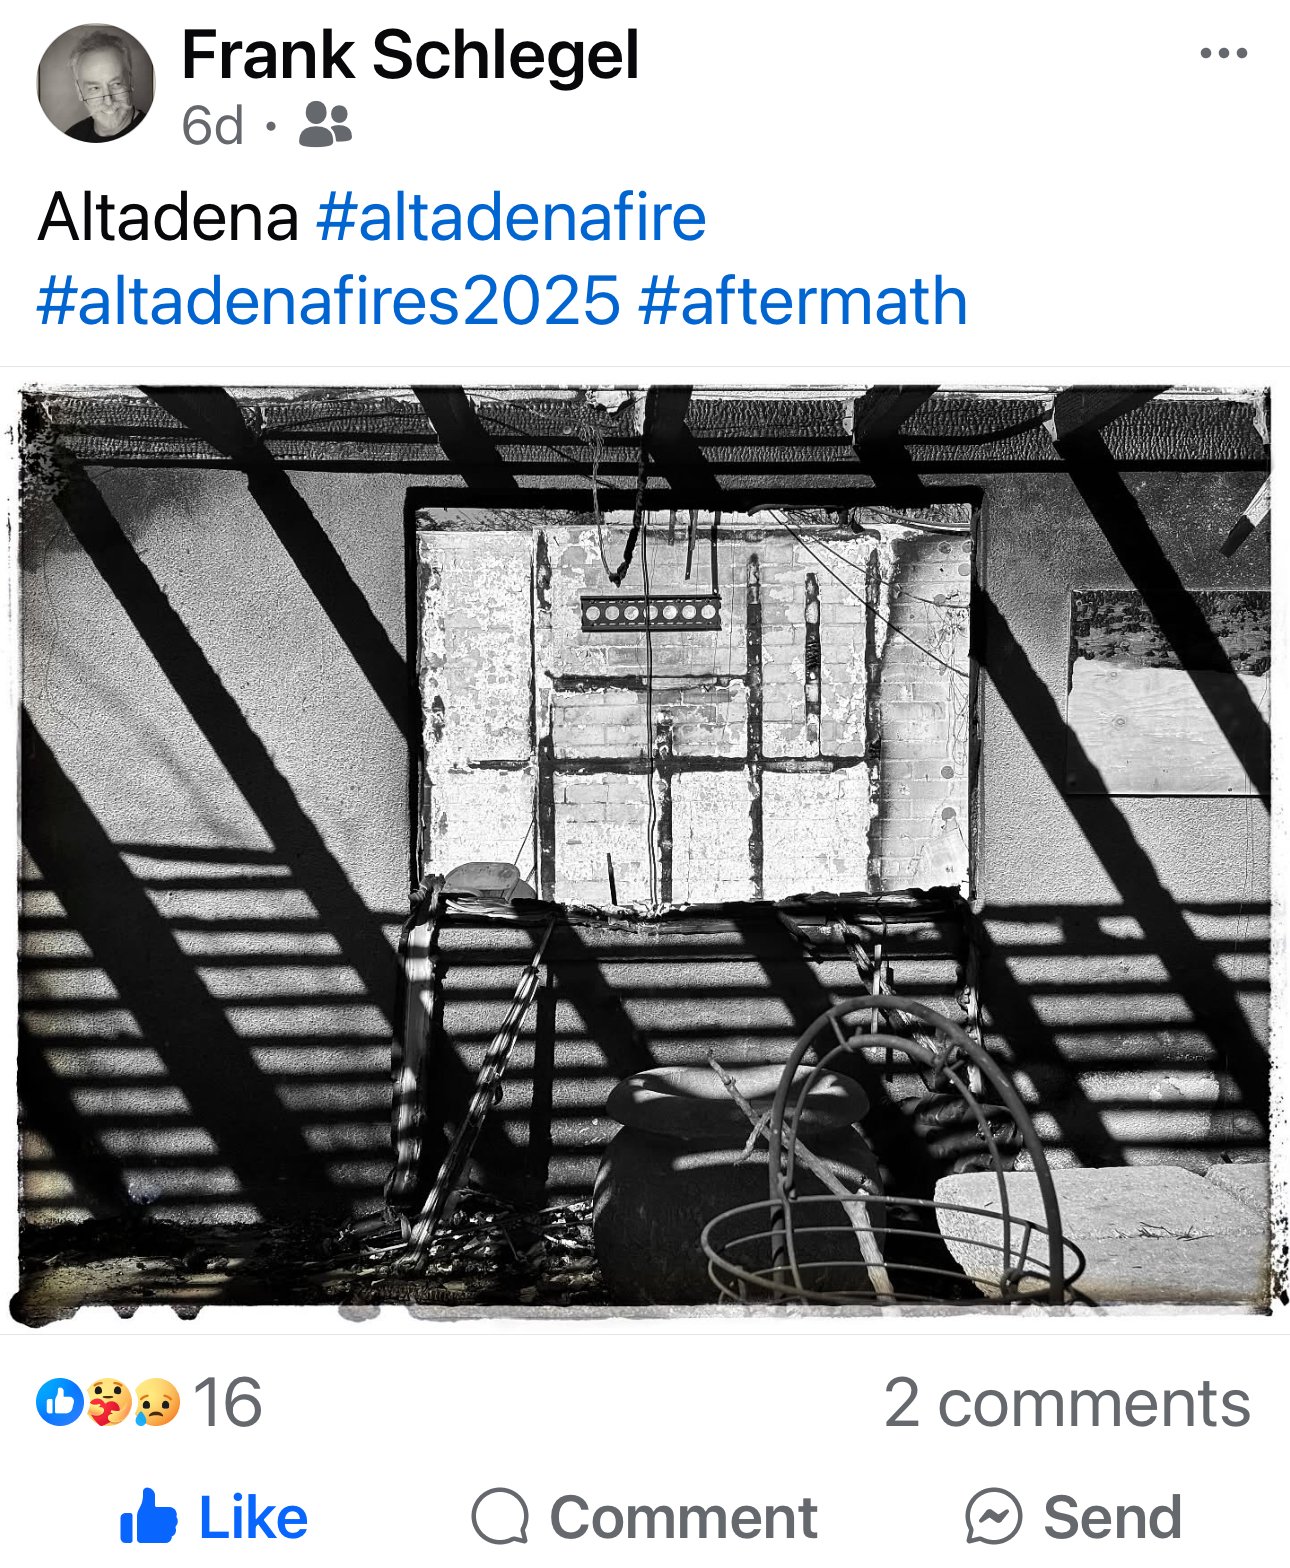
A number of Frank’s friends have stepped up to help him and I have tried to make myself available whenever he wanted to talk. The first couple conversations he really was dealing with the loss, there obviously was some shock still, but he was positive when it came to the task of moving forward. Shortly after the fire had swept through his neighborhood Frank started to photograph the devastation and his images were good, some of his best. I think Frank’s unique perspective was the reason. We talked about his photographs, and it was amazing how Frank was able to use his camera in healing process.

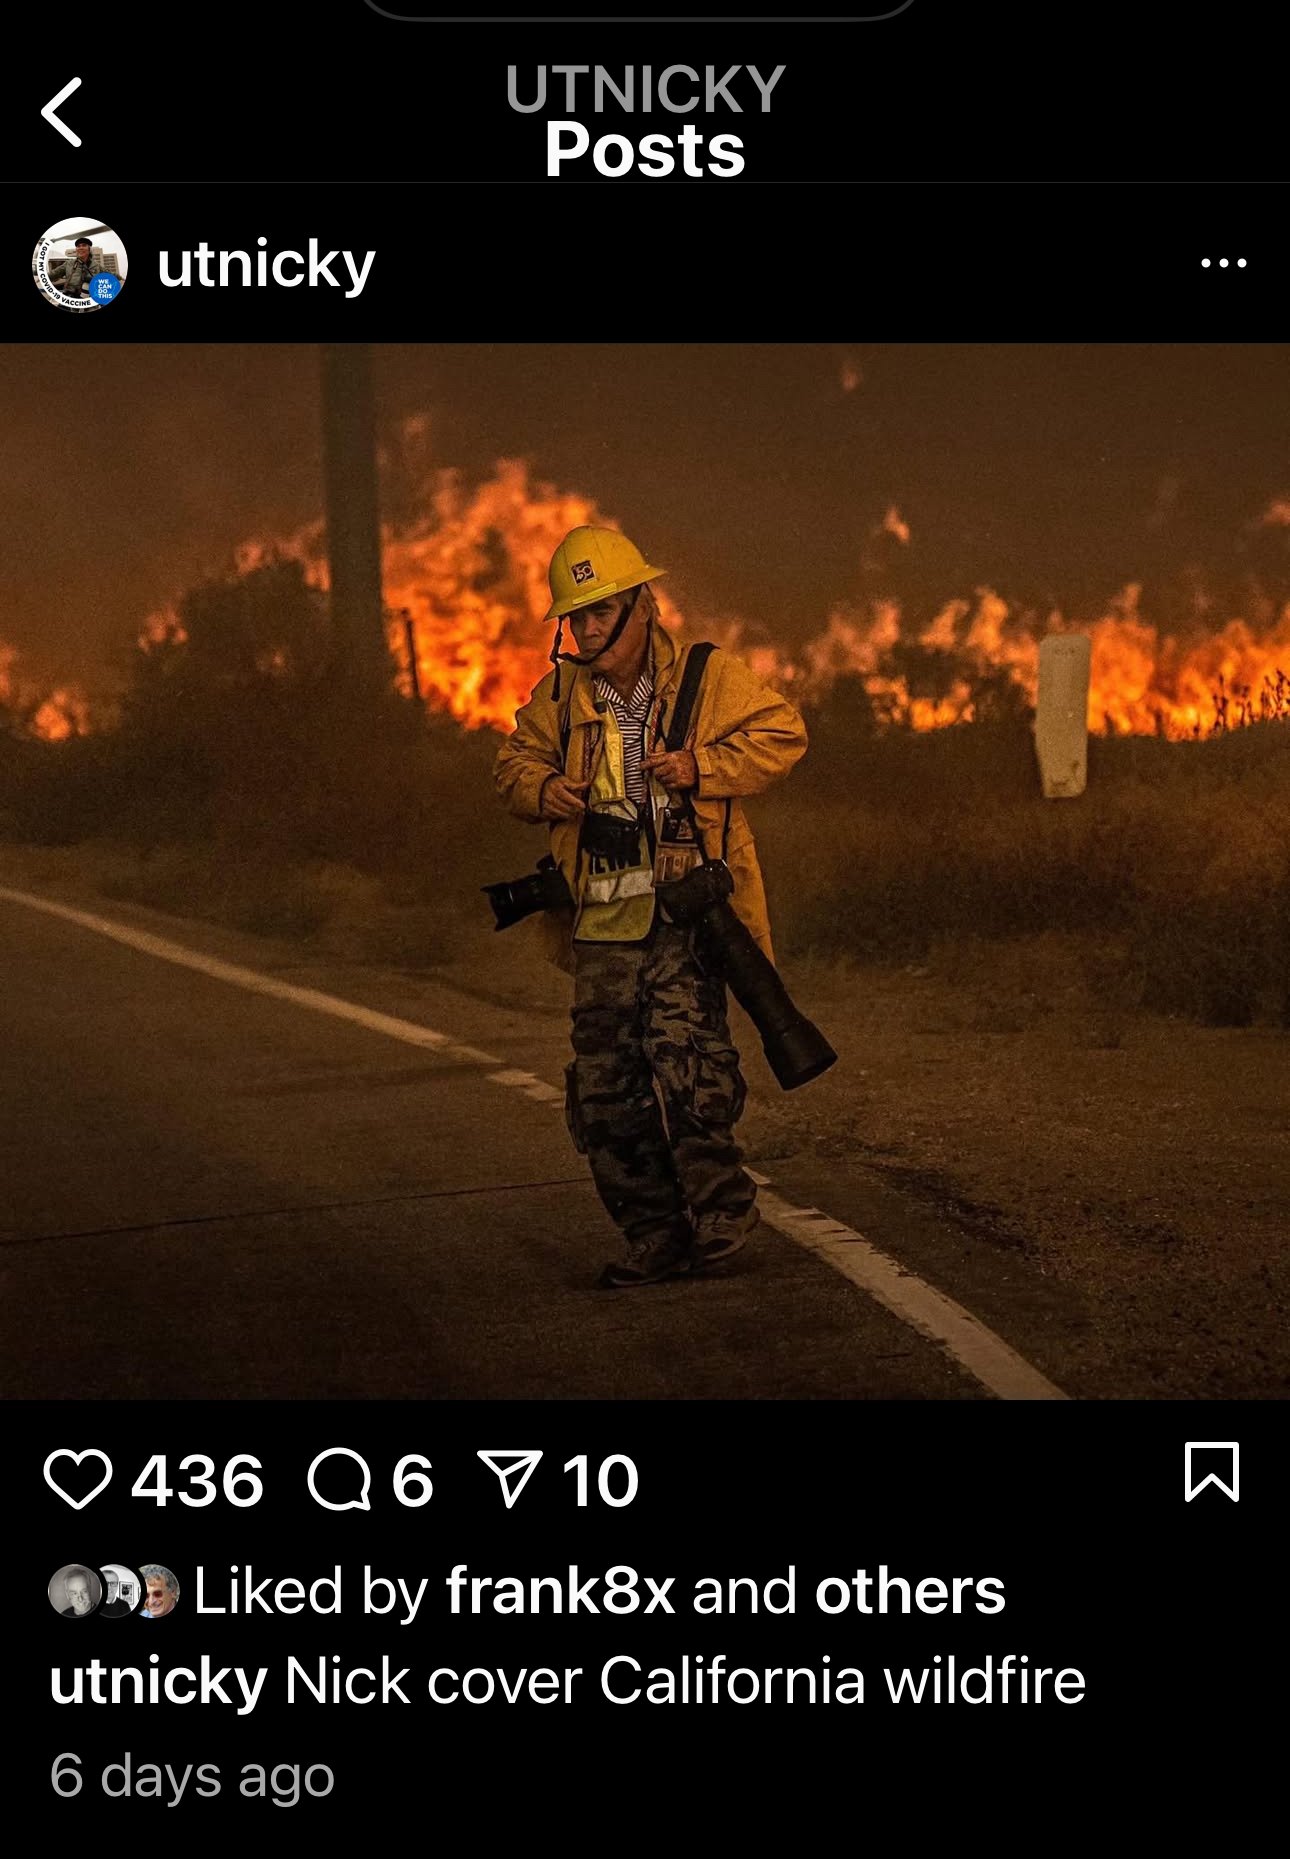
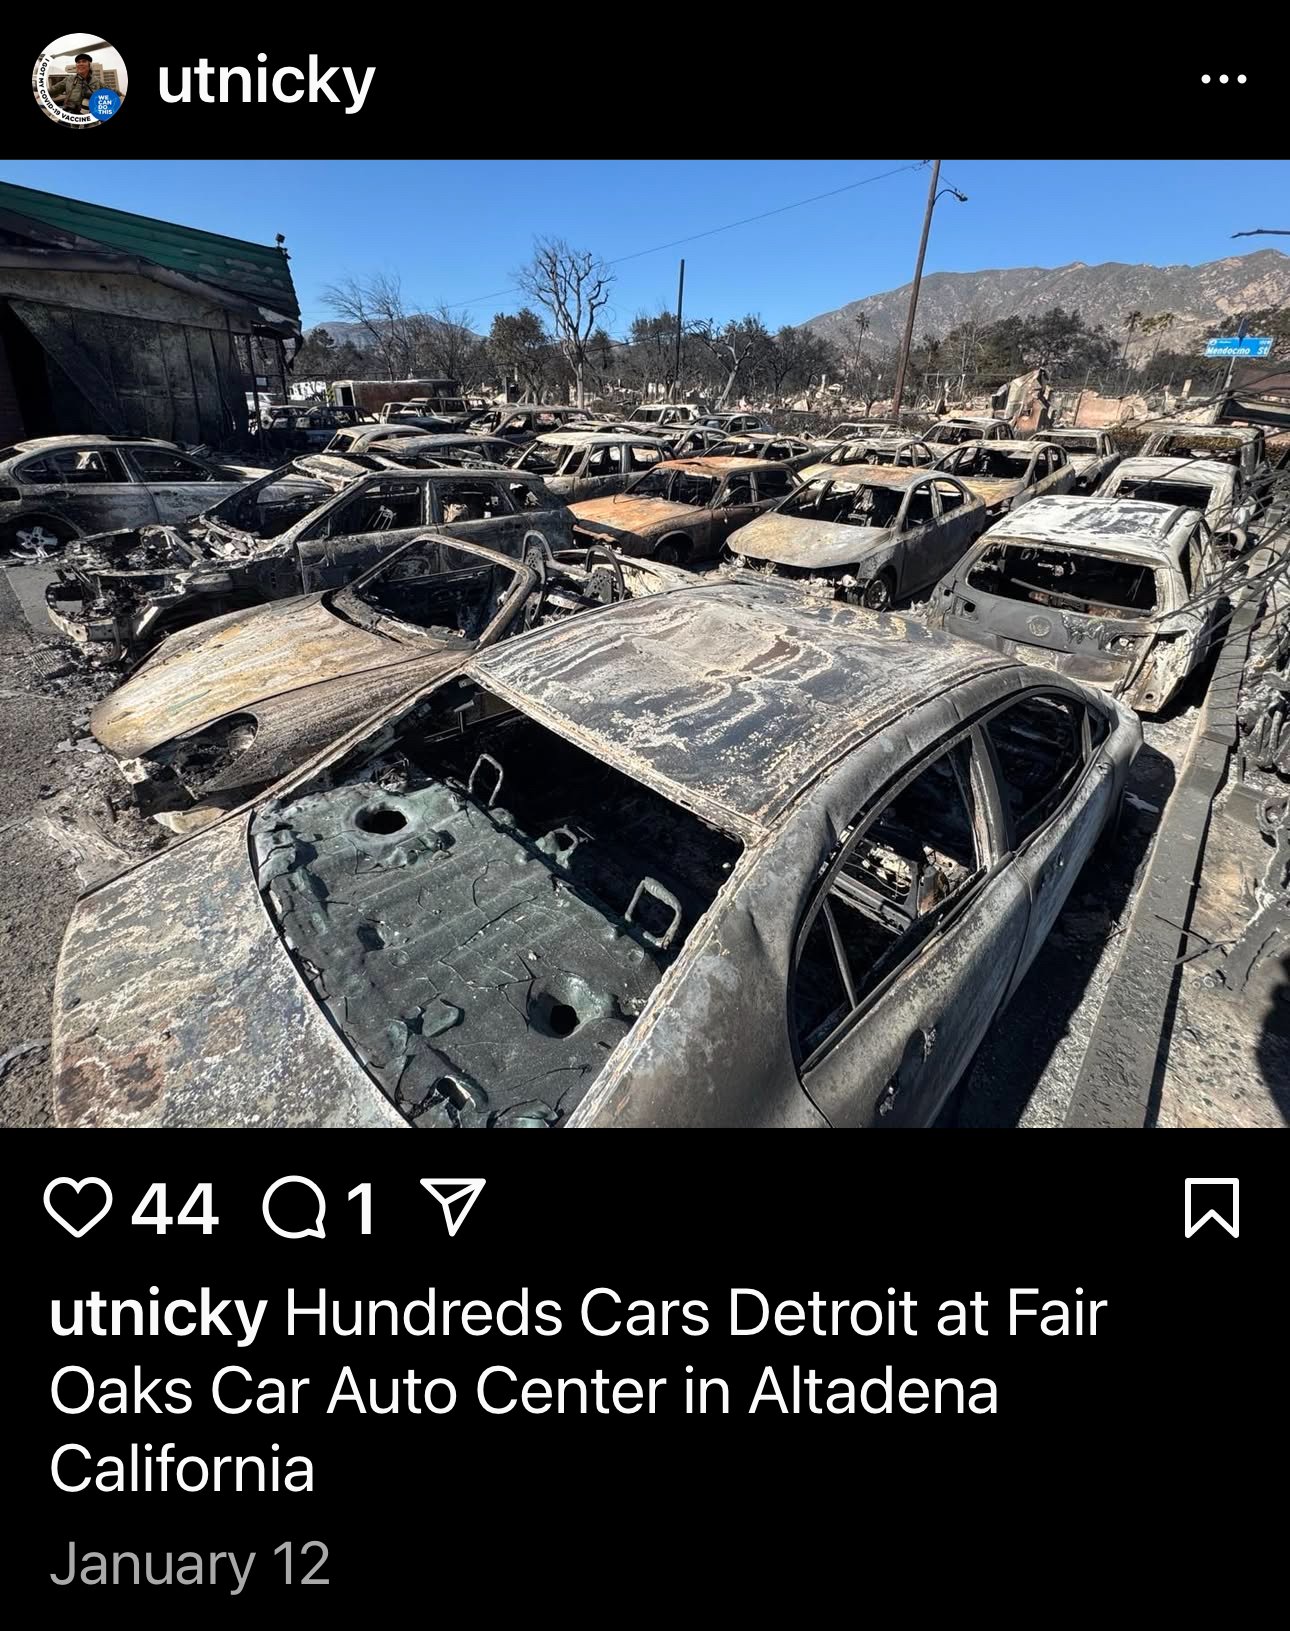
I think many of Frank’s Eaton Fire images are different from of my photographs in that he has really been locating and documenting incredible small details within the devastation. His photographic style or interest often was that way, for instance he loves photographing plant details at the Huntington Library, but the fire damage images are deeper because of his experience. I know my photographs from the Eaton Fire are different, my approach is different, I am photographing in a more methodical approach, almost forensic at times, spending more time in places. Every time I am up there photographing still has an intensity and with some emotional drain. I might be biased but there just seems to be a slight difference with photographs by local photographers who knew the area and ones who have come in from the outside. I know Pulitzer Prize winning photographer Nick Ut lives in Orange County and did an amazing job going from the Palisades Fire to the Eaton Fire in the first 24 hours. Nick is incredible with how much he is able to photograph, especially considering he is retired. Nick did a good job documenting a lot of different things in Altadena, especially the firefight, but he’s a press photographer it’s a different approach. I know Ken Light came down from the Bay Area and photographed both the Palisades and Altadena, but I have only seen a couple photographs from both locations, so I don’t know what his portfolio looks like. He is a good documentary photographer so I am interested to see what he photographed. Anther photographer that has stood out to me with the Eaton Fire is retired Pasadena Star News Photographer Walt Mancini, who was an outstanding local press photographer. I don’t think Walt was out photographing during the height of the fires, which was smart, but he was out the next day and has documented so many important things. The key to his images is he knows that area better than anyone else, and it shows in his images. As a kid and young photographer, I took note of Walt’s photographs in the paper all the time, and I know his images had an impact on my development as a photographer.

I have been trying to get Frank to write something for this blog post, but I know he has been too busy out photographing whenever he wasn’t working so I am still waiting on that. I even stopped by and saw him at Samy’s yesterday and checked in on him, he is doing good. When I get some writings, I will update this post with his words. While I was waiting for my camera sensors to be cleaned, I also talked with Jason Lyman, who manages the Pasadena Samys. Jason shared some interesting insight; he said sales were noticeably higher since the Eaton Fire. He said many customers were affected by the fires and he thought many of them were photographing the aftermath as part of the healing process. Below are screen grabs of some of Frank’s recent images as well as some of the other photographers Eaton Fire images.

UPDATE INFORMATION - On March 13th The Pasadena Weekly wrote an article about the Keychain Project and interviewed Frank. The Eaton Canyon Keychain Project is an art project where they collect keys to create works to memorial the loss of the Eaton Fire. Please check out the link.

Frank Schlegel’s Eaton Fire Portfolio:

View fullsize Frank's Apartment
View fullsize IMG_3998.jpg
View fullsize IMG_4066.jpg
View fullsize IMG_2404.jpg
View fullsize IMG_4394.jpg
View fullsize IMG_4393.jpg
View fullsize Day Care across the street from his apartment
View fullsize IMG_2405.jpg
View fullsize IMG_4374.jpg
View fullsize IMG_4392.jpg
View fullsize IMG_4372.jpg
View fullsize IMG_4366.jpg
View fullsize IMG_2403.PNG
View fullsize IMG_3506 (1).jpg
View fullsize IMG_4383.jpg
View fullsize IMG_4387.jpg
View fullsize IMG_4390.jpg
View fullsize IMG_4381.jpg
View fullsize IMG_4368.jpg
View fullsize IMG_4375.jpg
View fullsize Screenshot 2025-02-16 at 11.21.38 PM.jpeg
View fullsize IMG_4371.jpg
View fullsize IMG_4388.jpg
View fullsize IMG_4389.jpg
View fullsize IMG_4382.jpg
View fullsize IMG_4384.jpg
View fullsize IMG_4370.jpg
View fullsize IMG_4378.jpg
View fullsize IMG_2406.jpg
View fullsize IMG_4385.jpg
View fullsize IMG_4377.jpg
View fullsize IMG_4373.jpg
View fullsize IMG_4369.jpg
View fullsize IMG_4380.jpg
View fullsize IMG_4379.jpg
View fullsize IMG_4367.jpg
View fullsize IMG_4041.jpg
View fullsize IMG_2409.jpg
View fullsize IMG_2407.jpg

Some of Nick Ut’s photographs are below. I am still amazed that he photographed in the Palisades and was able to make it to the Altadena while the Eaton Fire was still burning. He does am amazing job going to the hard areas to photograph and I have come to really like his selfies to prove he was there.

View fullsize IMG_3539 (2).jpg
View fullsize IMG_3546 (2).jpg
View fullsize IMG_3541 (2).jpg
View fullsize IMG_3533 (1).jpg
View fullsize IMG_3542 (2).jpg
View fullsize IMG_3544 (2).jpg
View fullsize IMG_3538 (2).jpg
View fullsize IMG_3536 (1).jpg
View fullsize IMG_3537 (2).jpg

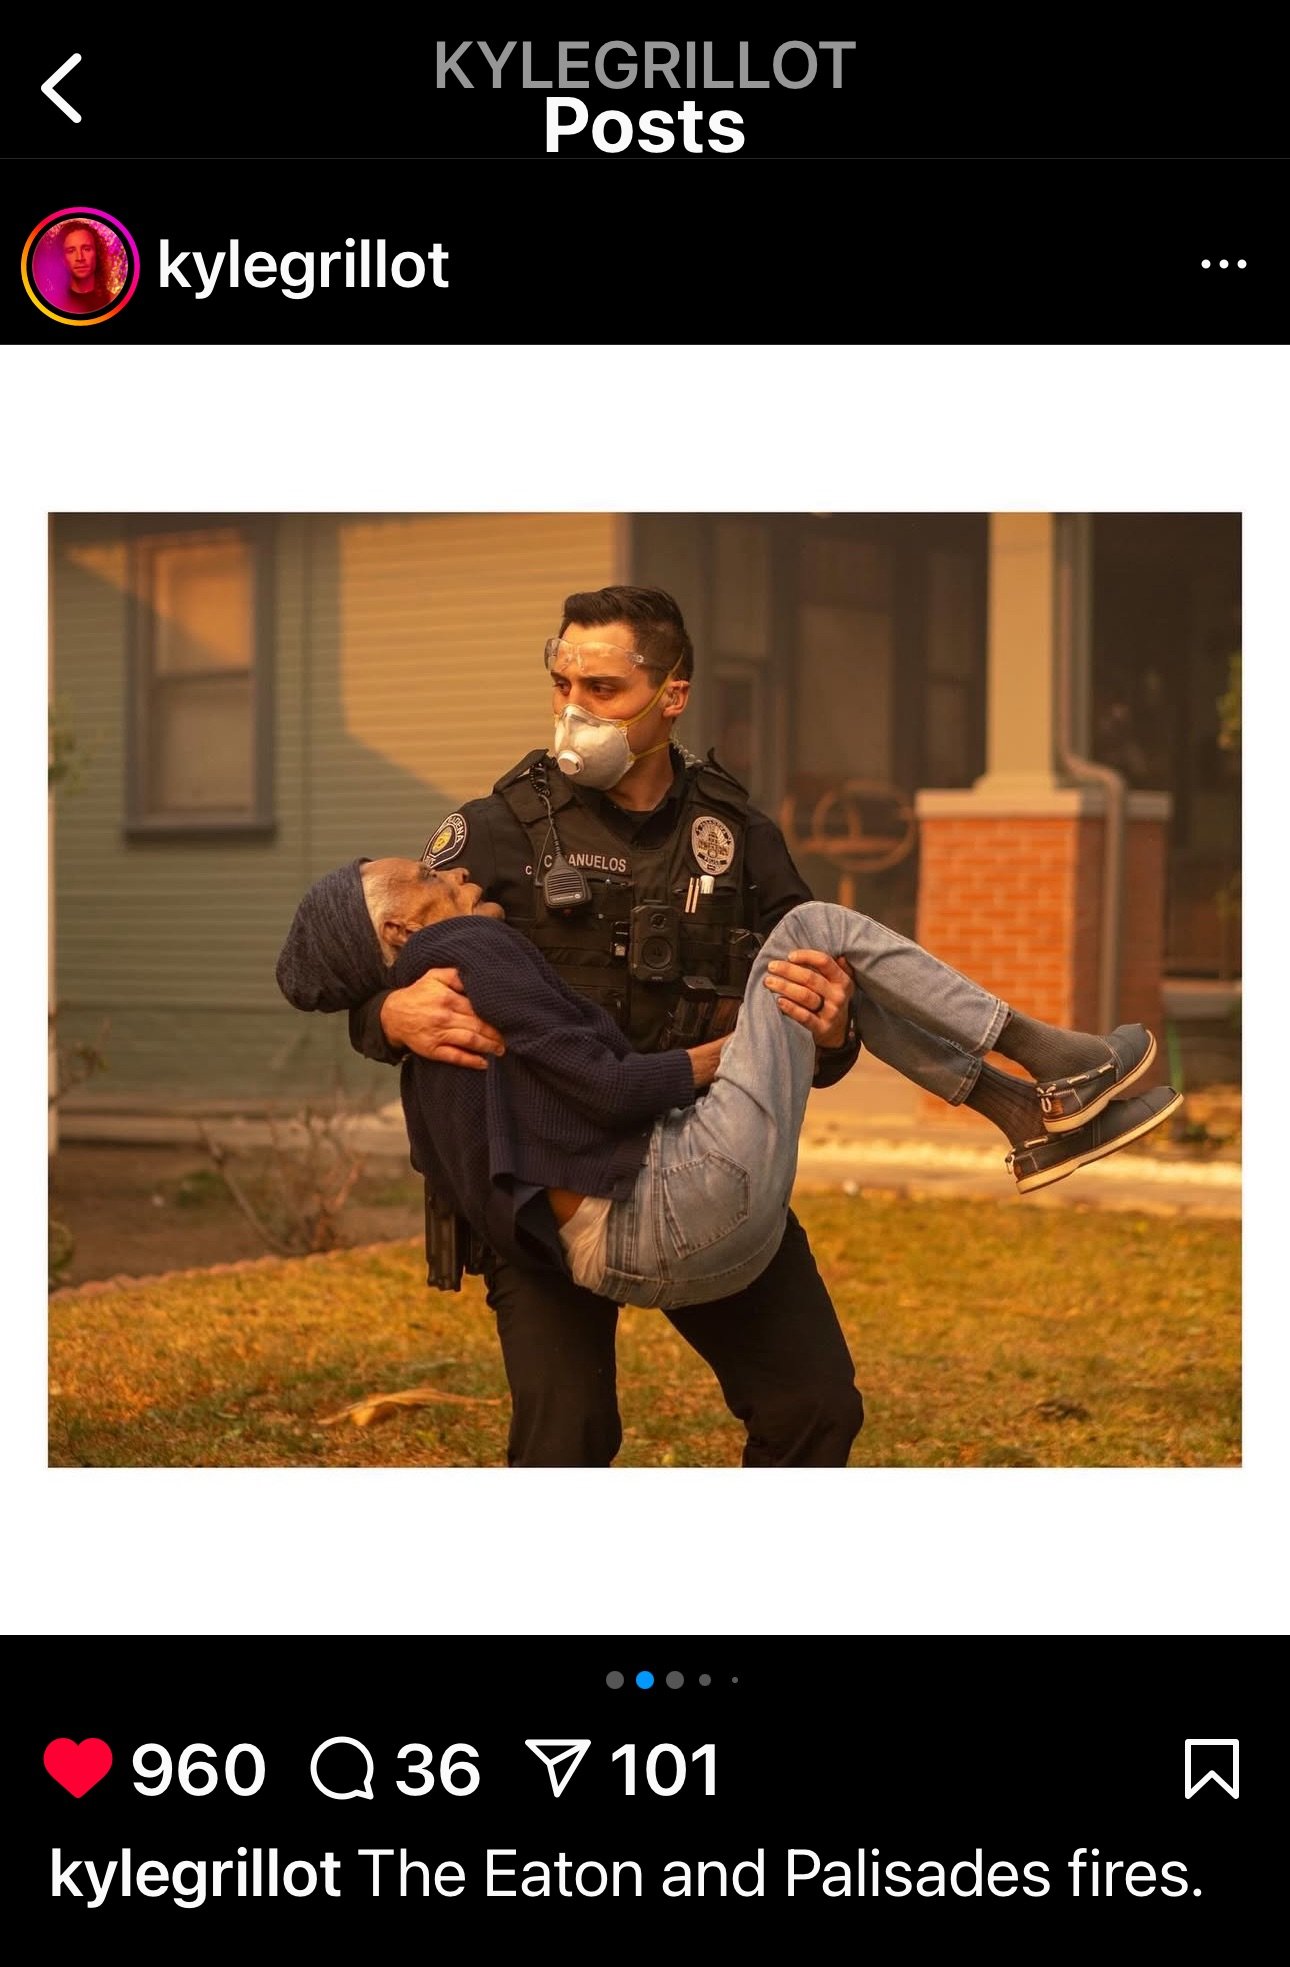
Kyle Grillot - Photographer

Kyle Grillot is a press photographer who captured one of the most iconic images from the Eaton Fire when he photographed Pasadena PD Officer Banuelos carrying a man to safety in Altadena (See Below), I believe on the morning of 1/8/25. I was not aware of Kyle’s work before seeing this image. He is a graduate of THE Ohio State University, and he has been photographing professionally for fifteen years. He absolutely is willing to go into the danger zone, his fire photographs, when he is in the middle of ember cast or raging flames are incredible. Among others, he photographs for the New York Times. I encourage you to follow him and check out his website. On his website check out the image of a Joshua Tree during the Bob Cat Fire, it is amazing. He was on Instagram @kylegrillot but minutes ago he made a post about Meta and said he was moving to Bluesky’s Flashes so hopefully you can track down his images.

Wally Skalij - Photographer

One last mention, I know Wally Skalij was out in the Palisades Fire, I am not sure if he made it to the Eaton Fire. Wally just announced his retirement from the staff of the Los Angelses Times yesterday. Wally was arguably the best Press Photographer of his era. He is a good documentary photographer, and I look forward to the portfolios he works on going forward now that he can be selective in his topics. He is another photographer who captured amazing images when he ran into the flames.

In Photography Tags Eaton Canyon, Eaton Fire, Frank Schlegel, Souther California Wildfires, Photography, Photographer, Wally Skalij, Kyle Grillot, Altadena, Altadena Strong, Samys camera
1 Comment

© 2024 William Karl Valentine - Fatal Collision, Chino, California (CPD DSC 1344 1-9-24) Nikon Z6ii with a 24-120mm Lens. ISO 16,000 f/4 1/320 at 24mm

The Best Camera for Low Light Photography - Nikon Z6ii / Nikon Z6 iii rumors

June 2, 2024

My photographs documenting the Pasadena Police Department in the 1980’s are some of my best-known images. I spent over a thousand hours riding in police cars documenting the officers working for that portfolio. I started off photographing with a Nikon F and finished up with a couple Nikon FM2 bodies. I used Kodak Plus-X film mostly, and later on I used some T-Max 400. Since I was photographing mostly at night, I used a Sunpak 522 Thyristor off camera flash which paired up great. The exposures were good, and the high contrast of the flash added to the images. Throughout my law enforcement career when I photographed at night, I had to use a flash although I did experiment pushing Kodak T-Max 3200 to an ISO of 25,000 one night. I actually got images using just streetlights, but they were very grainy.

A couple years ago I was asked to come back out and start documenting the Chino Police Department, where I had worked for 20 years, and I immediately agreed. I had been looking for an opportunity to photograph law enforcement in today’s world to compare the new images with my work from the 1980’s. I started off using a Nikon D850 with a flash and I tried photographing some without a flash since today’s sensors are so improved. I wasn’t getting great exposures in low light with the D850, the grain was too much, and the camera struggled with focusing. The D850 can produce some beautiful images in perfect conditions, but I have never loved the camera, especially the auto focus. I eventually went and talked to my friends at Samy’s Camera in Pasadena, some of them I have known for 40 years, and I asked which cameras performed best in low light conditions. I expected they would suggest a Sony A7IV or A1 or A9. Sony’s are amazing cameras and I had rented several different models recently when I was considering switching over to their brand. I liked the Sony’s I rented but none were perfect. Several of my contacts told me the Nikon Z6ii as the best low light still camera on the market. They explained that the smaller, 24 MB, full frame sensor handled noise better than most the 45MB sensors. I had no interest in the original release of Nikon Z series camera bodies because they did not have an SD card slot option and I was skeptical that the new lens mount adaptor would work well with my older lenses. I had recently read that Nikon had their Z line to now have SD card slot options and my friends explained how well the lens mount adapter was designed. I had wrongly expected that the adaptor would change the focal length of my older lenses, but learned the adaptor doesn’t because the sensor in the mirrorless Z series cameras had been moved forward to accommodate the adapter while maintaining the original focal length of the older lenses and the new lenses are designed with the new sensor position in mind (the lack of a mirror allowed this design to work).

View fullsize Attachment-1 (44).jpeg
View fullsize Attachment-1 (43).jpeg

Everything sounded right so I bought a Nikon Z6ii as a kit with the 24-120mm f/4 lens, along with an adaptor for my older lenses. The camera performance has been outstanding, and the 24-120mm lens is one of the sharpest lenses I have ever owned. I am not going to get into a detailed tech review here because there are other people that do tech reviews for a living and have access to everything to compare. Links to some of those sites are listed at the bottom of this blog post. What I will talk about is how the camera is performing me.

In low light conditions, the images I am getting with the Z6ii are amazing. I took the camera to Chicago in March for a weekend as my primary camera and the images were great. I specifically went to photograph my daughter play in an ice hockey tournament and this lens and camera combination were the best I have every used in a rink before. I also took the adapter and an F mount 100-400mm lens and that worked well. The adapter handled the auto focus well and ergonomically was good. I ended up using the camera more for my street photography than I expected. Lately I have been using a Sony RX100 VII for my street photography because I use it from the hip and most people don’t realize I am photographing. In Chicago I started using the Z6ii some for my street images and I was getting better images with that the Sony, so I went with it. Most days were overcast so the light wasn’t fantastic but that was fine for the Z6ii. The auto focus was solid, and the lens was so sharp I got detail like I never have before. Here are a few examples of the camera from Chicago:

View fullsize f/4 1/500  ISO 900
f/4 1/500 ISO 900
View fullsize f/4.5 1/1000  ISO 400 @ 24mm
f/4.5 1/1000 ISO 400 @ 24mm
View fullsize f/4 1/800  ISO 2200 @100MM
f/4 1/800 ISO 2200 @100MM
View fullsize f/5.6 1/800  ISO 5000 @400mm
f/5.6 1/800 ISO 5000 @400mm
View fullsize f/4 1/250  ISO 16000
f/4 1/250 ISO 16000
View fullsize f/4 1/400 ISO 16000
f/4 1/400 ISO 16000

The experiences in Chicago inspired me to photograph on the street more with a Z body. I need to also share with you that earlier this year, after having success with the Z6ii, and after becoming more and more frustrated with the focus ability of my D850, I bought a Z8. The Nikon Z8 is one of the most incredible cameras I have ever owned, and I am just scratching the surface with learning all it is capable of. The sensor captures outstanding images and the camera focusing is such a huge upgrade. I also got a 24-120mm lens for the Z8 which pairs perfectly. In recent months I have also added the following Z lenses: a 26mm, a 40mm, and a 105mm macro. All three of these fixed length lenses are super sharp. I bought the 105mm, which is capable of a 1:1 magnification like the old 60mm F mount Nikkor lens, primarily to do copy stand work of my old negatives so I can digitize the images (I have a process where I upload image files in Bridge to crop, open them in Photoshop to Invert the image, then return to Bridge to finetune it). I bought the 26mm and 40mm as walk around lenses and incase I wanted to take the camera into certain venues with camera restrictions. Both those lenses are sharp, super-fast, and lightweight. The 40mm is a little hard to use walking through crowds but the extra length has been great in certain situations. The 26mm is ideal for walking on the street and photographing from the hip, I have been able to use it somewhat like a range finder, and it is so small people don’t notice it. It also has a great balance when photographing with one hand a waist level. The 40mm and 26mm lenses are also very reasonably priced.

Example Images with Technical Information:

View fullsize f/4 1/1000  ISO 16000 @120mm
f/4 1/1000 ISO 16000 @120mm
View fullsize f/7.1 1/1000  ISO 8000 @104mm
f/7.1 1/1000 ISO 8000 @104mm
View fullsize f/4 1/1000  ISO 5600 @30mm
f/4 1/1000 ISO 5600 @30mm
View fullsize f/4 1/250  ISO 16000  @50mm
f/4 1/250 ISO 16000 @50mm
View fullsize f/4 1/320  ISO 16000  @24mm
f/4 1/320 ISO 16000 @24mm
View fullsize f/4 1/25000  ISO 4500 @120mm
f/4 1/25000 ISO 4500 @120mm
View fullsize f/5 1/320  ISO 16000  40mm
f/5 1/320 ISO 16000 40mm
View fullsize f/4 1/320  ISO 8000  26mm
f/4 1/320 ISO 8000 26mm
View fullsize f/3.2 1/1000  ISO 500   40mm
f/3.2 1/1000 ISO 500 40mm
View fullsize f/4 1/200  ISO 16000  @24mm
f/4 1/200 ISO 16000 @24mm
View fullsize f/5.6 1/250  ISO 12800  @78mm
f/5.6 1/250 ISO 12800 @78mm
View fullsize f/4 1/125  ISO 16000  @120mm
f/4 1/125 ISO 16000 @120mm

Camera lens and strap options for Street Photography

View fullsize Nikkor Z 40mm and 26mm lenses
Nikkor Z 40mm and 26mm lenses
View fullsize Z6ii with 24-120mm compared to 26mm lens
Z6ii with 24-120mm compared to 26mm lens
View fullsize Nikon Z6ii with the 26mm f/2.8
Nikon Z6ii with the 26mm f/2.8

I know it is late notice, but Nikon has all their Z camera bodies and lenses on sale through the end of this week. Camera bodies are discounted about 25% and lenses are about 20%. My daughter purchased a Z6ii with a 24-120mm lens, and the 26mm lens online from Nikon last week for approximately $2,400. She found an online coupon that coupled with Nikon’s Z discounts, and she utilized Nikon’s two-year interest free purchase plan (I purchased my Z8 with their 0% interest plan as well). Nikon is being very aggressive in the market now so I would expect the sales to continue or be brought back with some frequency this year.

I have a Peak Camera strap system on my Z6ii. I love the design of the locking disc. It makes it easy to go from a traditional camera strap position to a solo wrist strap position. The wrist strap pairs great when the 26mm lens is on for street images.

View fullsize Attachment-1 (38).jpeg
View fullsize Attachment-1 (42).jpeg

There are lots of amazing cameras and lenses on the market today, I have always used Nikon, I have friends that swear by Canon, and I know lots of people have gone all in with Sony. Because of all the variables I don’t think it is possible to have a camera that does every task perfectly, especially since cameras are now as much about video as still images. But I am convinced that right now the Z6ii is the best camera for photographing in low light conditions. I researched it online, talked to people with expertise, tested several different bodies and nothing came close to the Z6ii in low light. I am sure technology with continue to evolve and there will be better cameras in the future, but right now the Z6ii is my suggestion. (I also want to acknowledge that many cellphones like the iPhone 14 & 15 also create amazing low light images but obviously don’t have the same capabilities of real camera body)

Nikon Z6iii - Now Pre-Ordering $2,496.95 Delivery estimated 6/25/24

As I was wrapping up this post, I checked Nikon Rumors and saw there was talk that Nikon might be announcing a Z6iii in a couple weeks which could explain all the recent sales. Well, it has been announced and I wanted to update this. Samy’s has a great video review of the camera already on their order page for the camera. Link below.

The Z6iii has been announced and pre-orders are now being taken by Samys and B&H

Links to Reviews:

DP Review December 15, 2020

DP Review on You Tube December 2020

Nikon Website Z6ii

SLR Lounge 2021

In Street Photography, Photography, Photographer, Camera Equipment Tags Nikon Z6 ii, low light photography, Mirrorless Cameras, Nikon Z6iii, Nikon Z8, Samys camera
Comment
Installing the exhibition - push pins, level, tape measure, and “eyeballing it” 1/24/20

Installing the exhibition - push pins, level, tape measure, and “eyeballing it” 1/24/20

William Karl Valentine - Exhibition at SAMYS - Pasadena, California

March 3, 2020

I drove the 500 miles home from Tucson on Sunday afternoon after everything with the Legacies of LIGHT symposium wrapped up.  The next day I headed to Pasadena to check in on my mom and run some errands.

I stopped in at Samys Camera to get a couple things and to tell my friends there about the experience I had at the symposium.  While talking with Jeff O’Brien he told me how the prints on the store’s small gallery wall had been up almost three months and he wanted to get some new photos up.  He knows my work well and asked me to come up with something.  I immediately agreed and started thinking about what I would do.

This reason I am going in to so much detail with this blog post is I want to give the reader insight into my thought process and approach to a simple exhibit so they can better understand approach to photography.

I realize the back wall of a camera store is not necessarily prestigious but in this case it had a lot of value.  First of all the wall is very prominent and accessible.  Almost every customer sees the wall when the exit the store and any customer going to the rental department walks right by it.  This store has lots of knowledgeable photographers who are customers, plus it is two block away from a Pasadena City College which has an outstanding photography department.  So the volume of potential viewers is very good. 

I grew up in Pasadena and went to Pasadena City College, for me there was sentimental value to go home again.  I had also exhibited work at Flags Photo (camera store) in Pasadena during the 1990’s, the store Jeff’s father had owned.  I know that most any opportunity to showcase your work is a good thing because you never know who may see your images.  I also know the process of editing and presenting an exhibition is a great exercise for a photographer.

When it came to what images to show I knew I had to include the image from my Pasadena PD series which was in the CCP’s Qualities of LIGHT exhibition, but I didn’t want to only showcase images from that series because they are from 34 years ago.  I knew I wanted to give an overview of my work when I started editing for it, was thinking a linear display at first, and wanted to highlight images which had been in prominent exhibitions or were in permanent collections.  I also had only glanced at the wall, had a guess at the size, but I hadn’t measured it.

Because I wanted to turn the project quickly I decided to make prints specifically for the show and didn’t want to deal with framing them.  Michal Raz Russo’s presentation at the Legacies of LIGHT about some of the LIGHT gallery’s installations was fresh in my mind, so I started thinking about a simple way to the present work.  The more I thought about it I realized I wanted to avoid a single straight row of prints and that I wanted to break up the pace of the images visually.  I decided to make digital prints that were all consistent with each other even if the images were from film.  I just can’t bring myself to casually display good silver gelatin prints since it takes so long to make them.

I started going through my image files thinking about which other images would fit.  Lee Baroni applying the Carotid hold on the Duster jumped out as a good companion to the CCP image.  The photo of Lee is in the permanent collection at the University of New Mexico.  The Photograph of the motorcade from Officer Russ Miller’s funeral was another obvious choice.  It was featured in the Billboard Creative in Los Angeles a couple years ago and is a signature image.  “The Killing Fields” image is in the permanent collection of the Fogg Museum at Harvard, plus it represented my Rio Hondo Police Academy series well.  I chose the “Simulcast Race” image from my Santa Anita book because it is one of my favorites.  I also wasn’t looking to inspire any more debate over the horseracing industry which an actual horse related image might do.  I chose the photo of the Giants coaches to represent my Cactus League series because it really captured how pure spring training used to be.  In today’s world I would never be able to access to stand in that position to capture that exposure.  I liked the Mariano Rivera image to represent my Wrigley-Fenway-Tiger series because it would help transition well into my street photography images.  An interesting side note had never printed the image as large as I did for this exhibition and when I did I found new and exciting details in the image I had not seen in the 23 years since I had made the exposure.  The view of the World Trade Center from the Empire State Building was another obvious image and one I have wanted to show more.

After selecting those 8 images I figured I probably had enough images but decided to choose more images so I would have options in my wall design since I was going to figure things out as I installed it.  The ASU pool party image was a good representation of my Alphaville series and I came across a scan of ERA activists from San Francisco in 1989 which really jumped out at me.  I have become so tired of today’s world with people who have differing opinions screaming at one another and thinking they are properly applying their 1st Amendment Rights.  After these choices I selected five recent images that I keep returning to.  I wanted to have images from Chicago, New York, and Newport Beach in the show if I could.  One image was in color from the 4th of July and I didn’t think it would fit but I decided to print it and just see if there was a place for it.

View fullsize WKV Samys 2020 exhibit 11.jpg
View fullsize WKV Samys 2020 exhibit 8.jpg
View fullsize WKV Samys 2020 exhibit 10.jpg
View fullsize WKV Samys 2020 exhibit 9.jpg
View fullsize WKV Samys 2020 exhibit 12.jpg

Since the prints were just for this exhibition I added text to the prints below the image so I wouldn’t have to deal with identification labels. I put the image information and because they were on display in a camera store I also added information about the camera I used and the film type for the older images.  I also listed information if the image was in a permanent collection or had been in a recent prominent exhibition.  After making the 15 different prints I made a single 8.5 x 11 print with all the images on it in a rough design which I thought might work.  Actually I thought the first four rows would be as they were and the last row was just a reference point of the images, that I would only use a couple of them maybe.

The reference sheet I used while designing installation of the exhibition.

The reference sheet I used while designing installation of the exhibition.

I wrote the artist statement specifically for this exhibition with the primary focus being my connection to Pasadena.  Realizing many viewers would be passing by quickly I used bold font to highlight key points so the statement could be quickly scanned.  Because I am always trying to increase the exposure of my work I created several QR codes with links to my Instagram and website then created an information page for people who wanted to learn more about my work.  I also created a smaller page with a QR code link for the Qualities of LIGHT exhibition.

WKV+Samys+2020+exhibit+5a.jpg

I decided to pin the images to the wall, because it was a quick and secure way to install the show plus it would do minimal damage to the wall.  I also liked the look and feel of presenting that way, but I knew I needed to have metal push pins for it to be right.  I thought the idea of the pins was a simple one until it came time to buy them.  I literally had to go to four stores to finally get enough pins for the exhibition, thank God for Office Depot still carrying them.

I began the installation process with a tape measure, note pad, and math.  I also realized the angle of the floor next to the wall was greater than I remembered since it really a ramp allowing handicap access to the store and easy carryout for large amounts of rental equipment.  So obviously the sight line of the space changes and I had to take that in to account. 

View fullsize WKV Samys 2020 exhibit 6.jpg
View fullsize WKV Samys 2020 exhibit 7.jpg
View fullsize WKV Samys 2020 exhibit 3.jpg
View fullsize WKV Samys 2020 exhibit 7A.jpg

I always remember from my Northlight days at ASU that the center line of artwork should be like 56” from the floor.  I know I am 6’5” and that I like a higher center point, plus I realized the way the store was configured I wanted to have at least some of the prints high enough to be seen above the displays to draw viewers in.  Using blue painters tape I marked the center line from the floor up.  I taped up a couple test prints and I had my friend who is much shorter than I am go along the wall to find what her eye level was.  From that point I went by feel and judgement to adjust the center line and then kept it fairly consistent to the floor by measuring for each new row of prints. 

I found that double stacking two vertical images made them too hard to view so I adjusted the Pasadena PD images to go side by side.  I decided to pin the prints keeping a 3” gap between all prints.  I also used my level with a built-in ruler to keep things accurate.  I then kept putting up prints, designing as I went.  I had the one-color print left over, but I soon found a place for it. The next section of the wall surface changed, and it had a large framed color print on it which was is a permanent thing but lots of blank wall before it.  So, I found a home for the 15th print.

I know this is a relatively long blog post on a simple thing but I thought some readers may find value with the insight in to my process.


This Samys Camera store is located at 1759 E. Colorado Boulevard in Pasadena, California and is open daily 8am to 6pm.  I am not sure how long the exhibition will be up, most likely through the end of March. 

William Karl Valentine

William Karl Valentine


In Galleries, Photography Tags William Karl Valentine, The Center for Creative Photography, Pasadena, Pasadena Police Department, Pasadena City College, Michal Raz Russo, Fogg Museum, LIGHT gallery, #light2020, Samys camera
Comment
Blog Index

Instagram

https://www.instagram.com/williamkarlvalentine/


Twitter

@Valentinephotog


Powered by Squarespace